FlareOn11 Writeup
This was my first flareon! While I only got to challenge 7 out of 10, I am fairly happy and definitely had a lot of fun. Below are my solutions to challenges 1-6. Enjoy!
01 frog
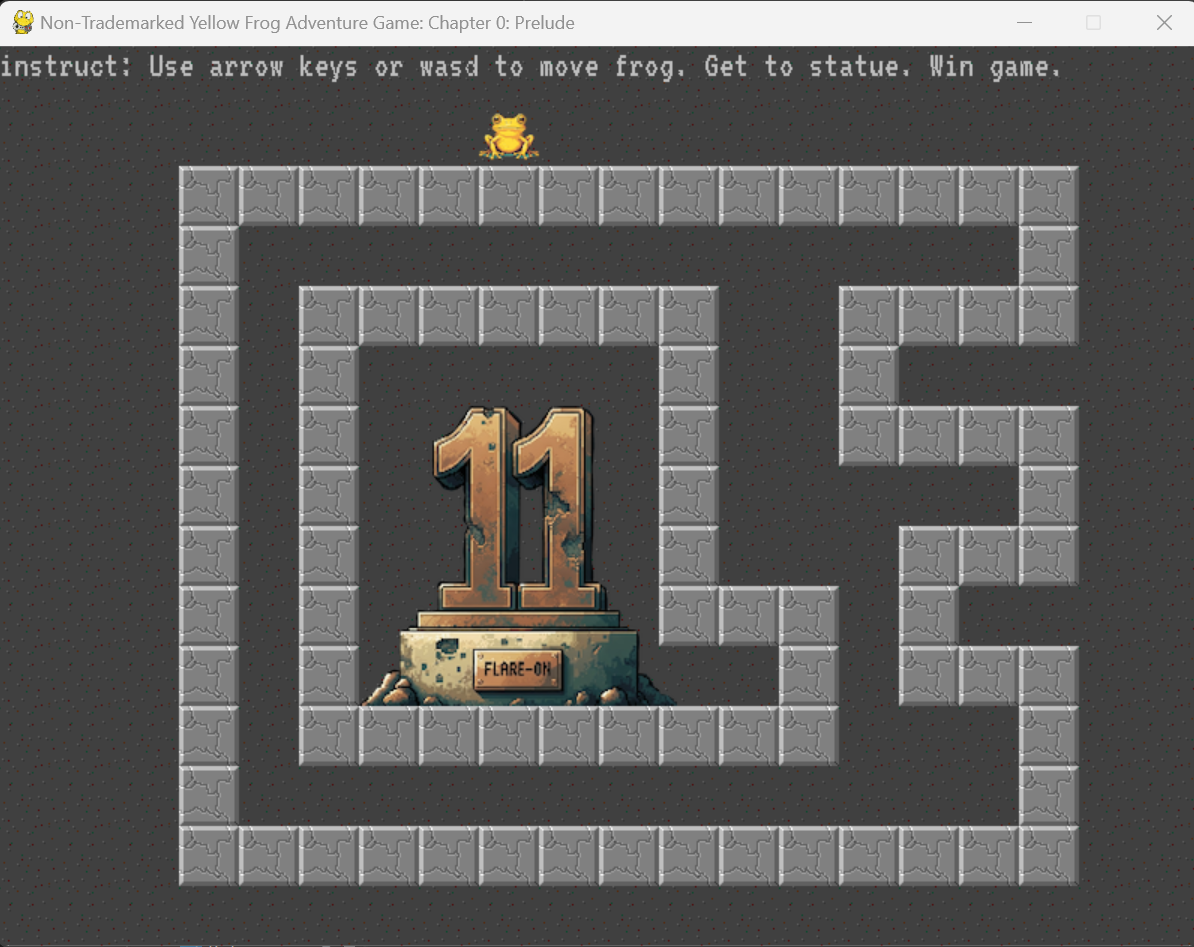
Just a fun little game written in PyGame (Python) where we have to move a frog to the goal to reveal the flag:
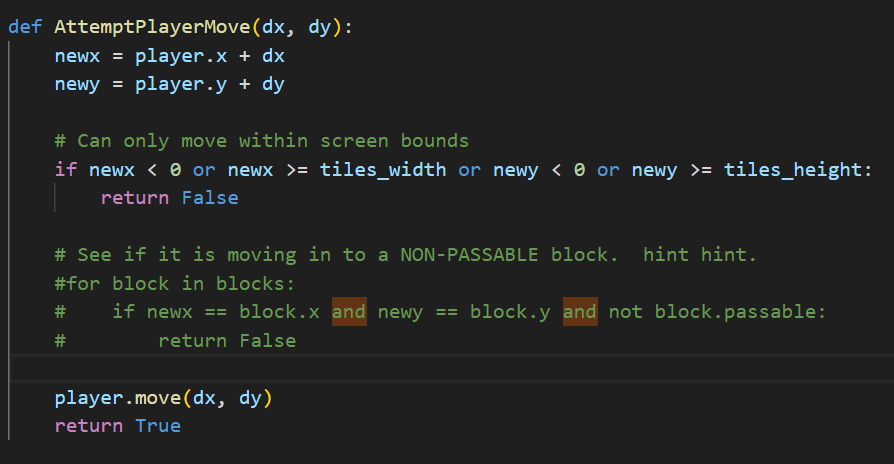
Since its Python and we got the source code, we can just comment out the collision logic and get the flag:

02 Checksum
This features a golang program, that first asks for some math problem solutions and then for a checksum.
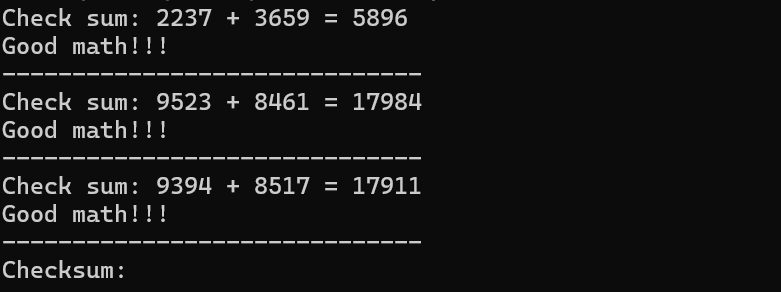
The math problems at the beginning of the Program are actually not relevant to the solution, so they can be discarded:
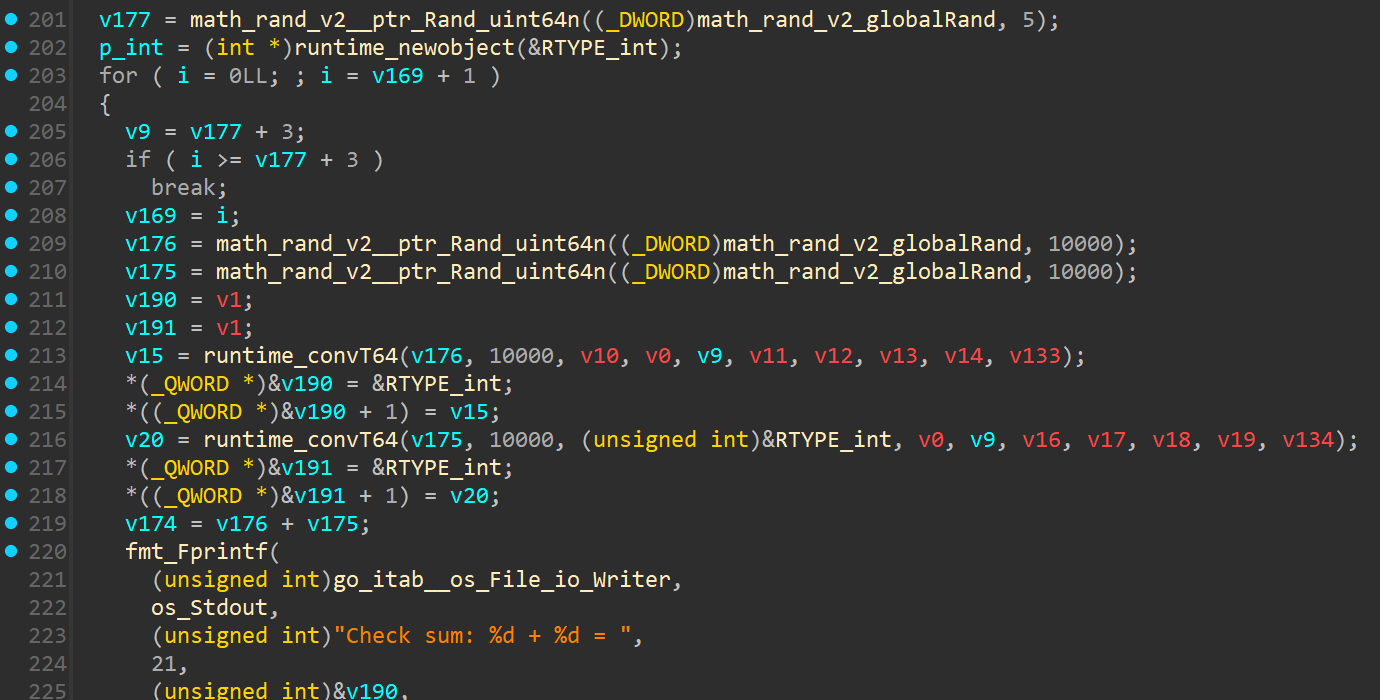
We can skip this by patching the loop comparison with a jump to the end of the loop and an additional NOP to fill the space:
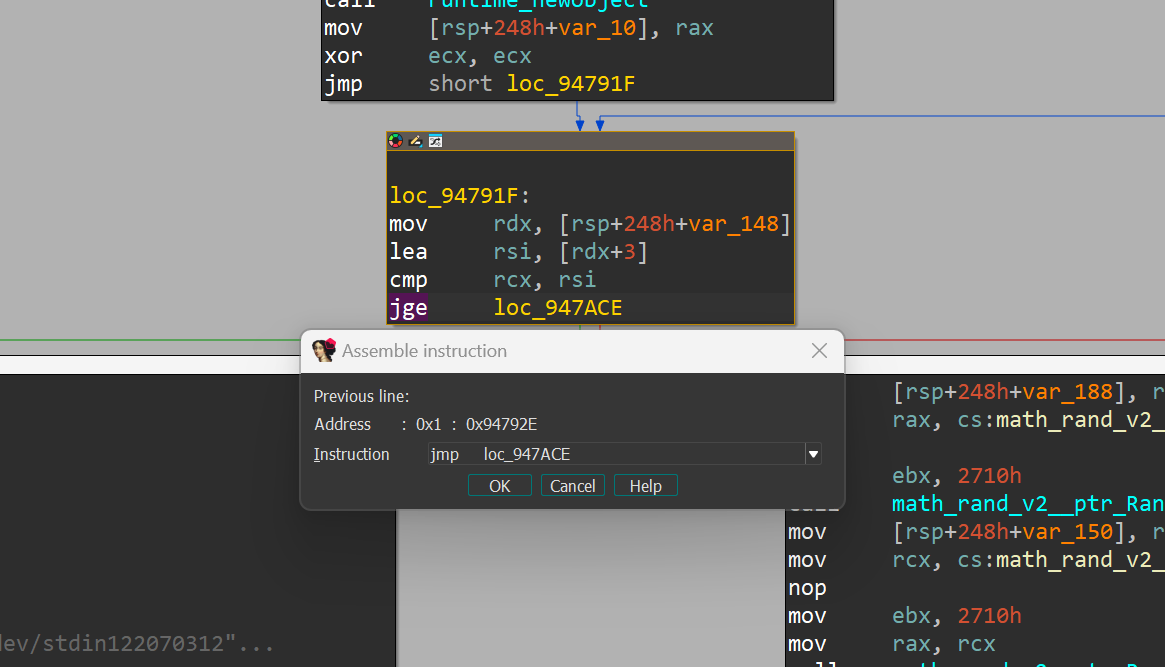
This way, we directly end up at a Checksum: prompt, without having to solve math problems first.
The input for this prompt is used as a key for a chacha20poly1305 cipher. However, this input is also checked in the function below, which validates it against a certain byte sequence:
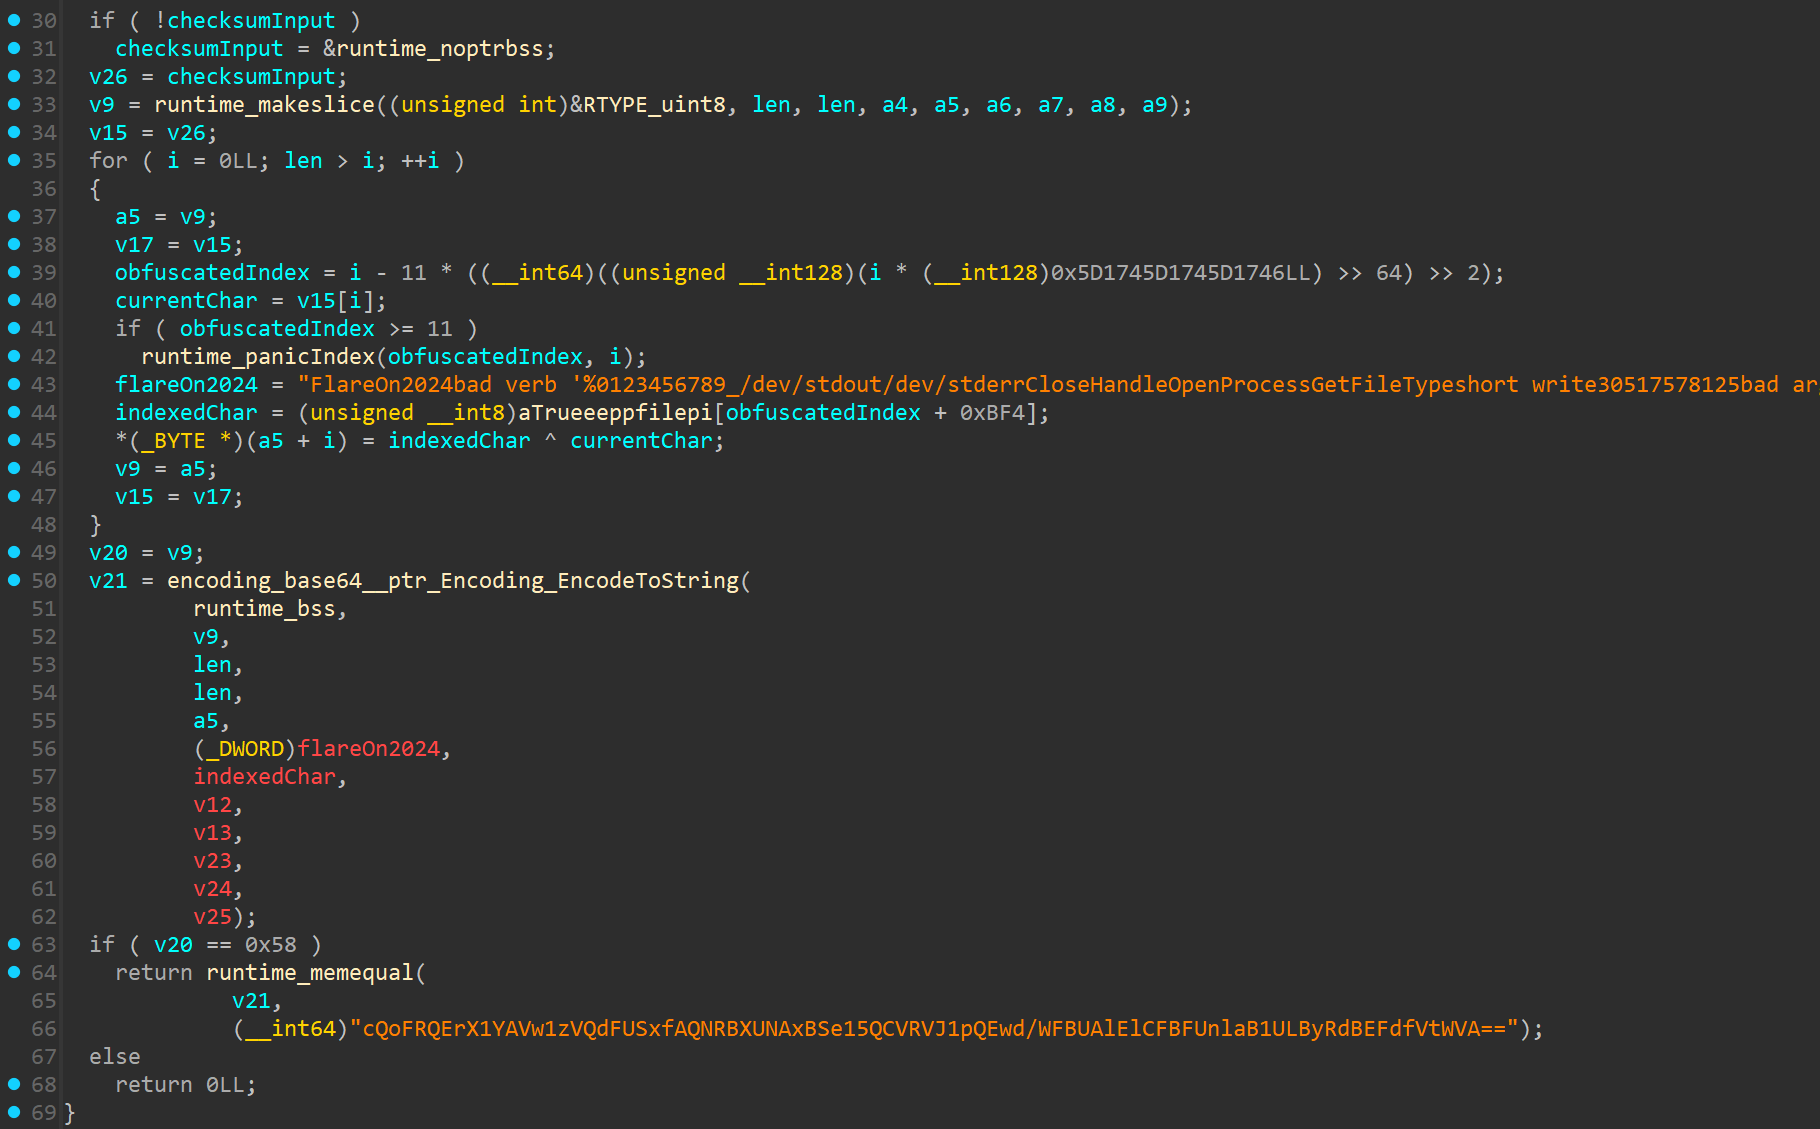
The for loop at the top transforms our input, which is then checked if it matches the bytes represented by the base64 string at the bottom.
I spent more time than I want to admit reversing this decryption, when in the end it turns out it is just an obfuscated XoR with the key FlareOn2024.
Thus, we can decrypt the base64 string at the bottom with the xor key and a little python script, to reveal the checksum we need:
import base64

solution = "cQoFRQErX1YAVw1zVQdFUSxfAQNRBXUNAxBSe15QCVRVJ1pQEwd/WFBUAlElCFBFUnlaB1ULByRdBEFdfVtWVA"

solution_bytes = base64.b64decode(solution)
length = len(solution_bytes)

key = b"FlareOn2024"
solution_final = ""

for i in range(0,length):
    solution_final += chr(key[i % 11] ^ solution_bytes[i])

print(solution_final)
# 7fd7dd1d0e959f74c133c13abb740b9faa61ab06bd0ecd177645e93b1e3825dd
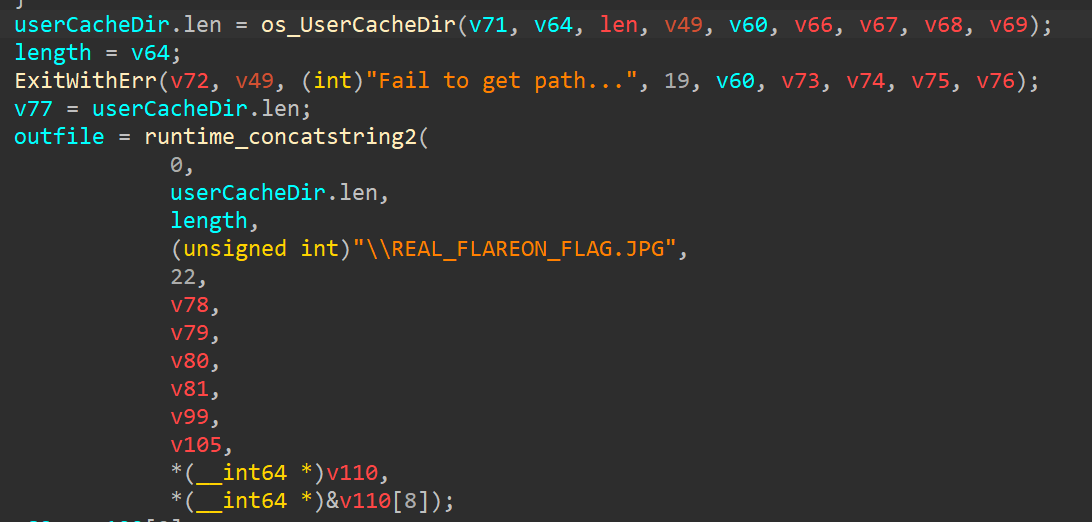
Now where is the flag? If we look at the decompiled binary, it creates the flag as a picture in %LocalAppData:
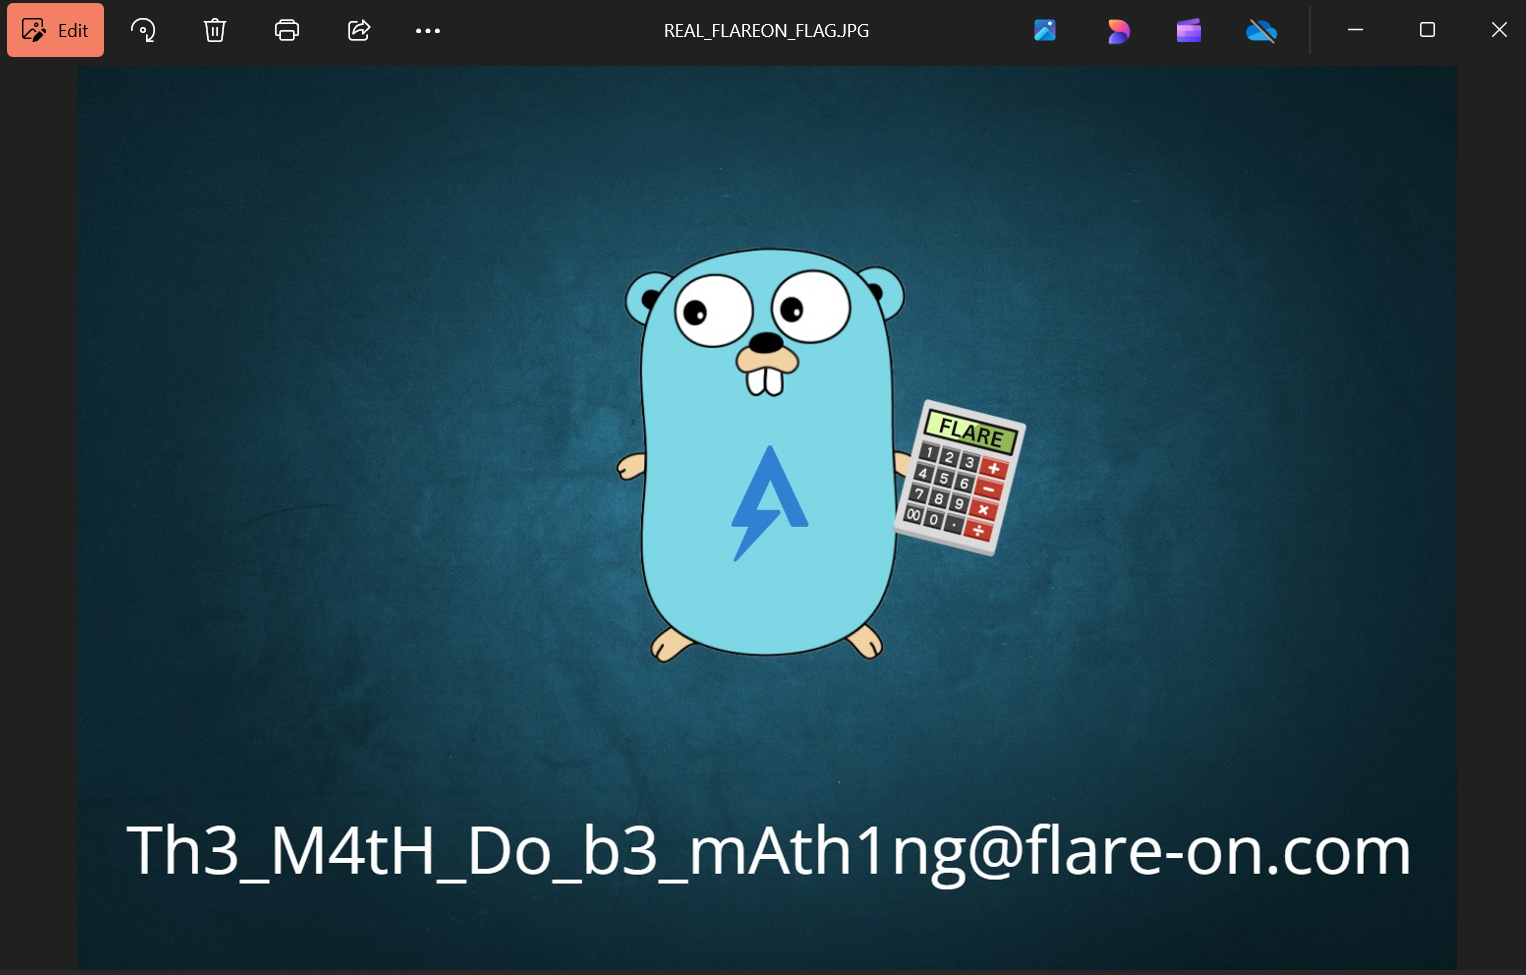
Et voilà:
03 aray
Aray - reversing yara. Here we are faced with a yara rule and need to find the file that matches this rule:
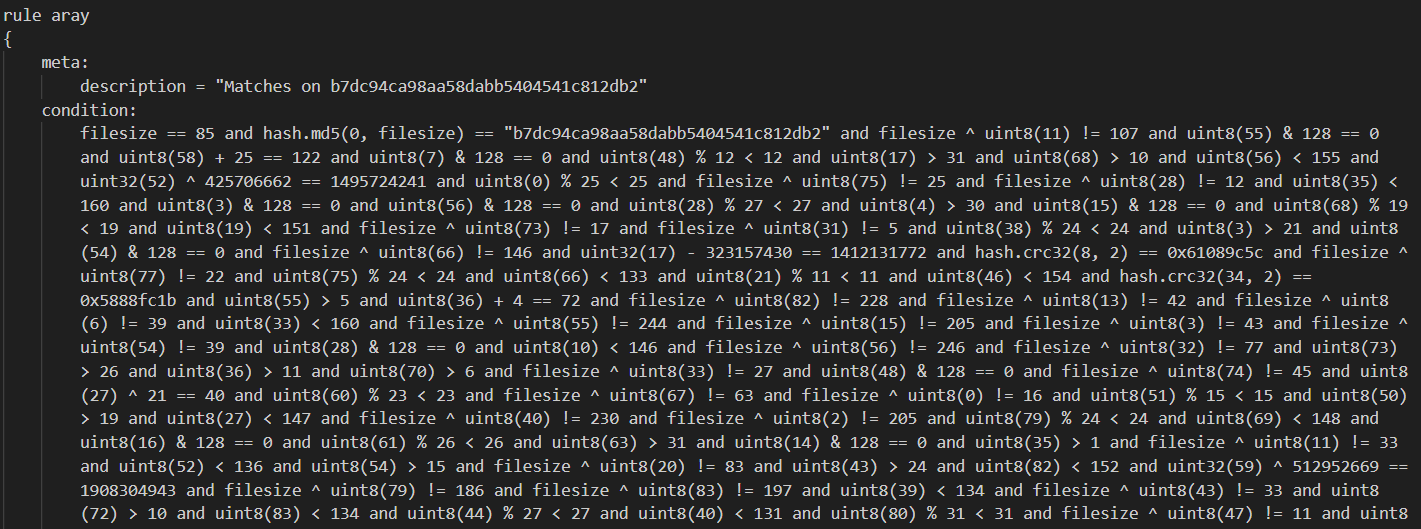
You get the gist.
Theres many junk rules, such as uint8(60) > 14 or uint8(47) % 18 < 18 which do not really mean anything, but if we extract those that mean something definite, such as uint32(70) + 349203301 = 2034162376, uint32(22) ^ 372102464 = 1879700858 or hash.md5(0, 2) = "89484b14b36a8d5329426a3d944d2983" that have an arithmetic inversion or can be bruteforced (hash values), i.e. a condition with only one solution, we reveal the flag char by char.
To be honest, I solved this on paper because I figured it would be faster than doing it programmatically. I grep'ed out the relevant expressions and noted down the respective char, which ended up in a file with the following flag as its content:
rule flareon { strings: $f = "1RuleADayK33p5Malw4r3Aw4y@flare-on.com" condition: $f }04 Mememaker

For this challenge we are presented with an .html page showing a meme generator. Obviously, we first look at the js code:
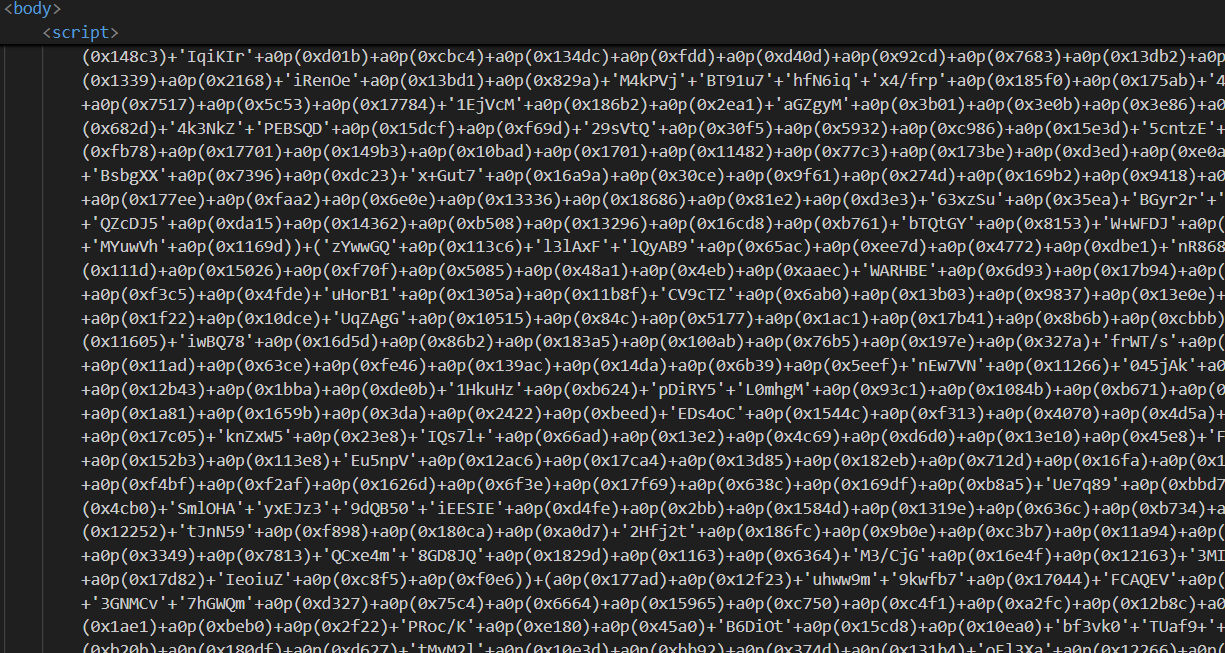
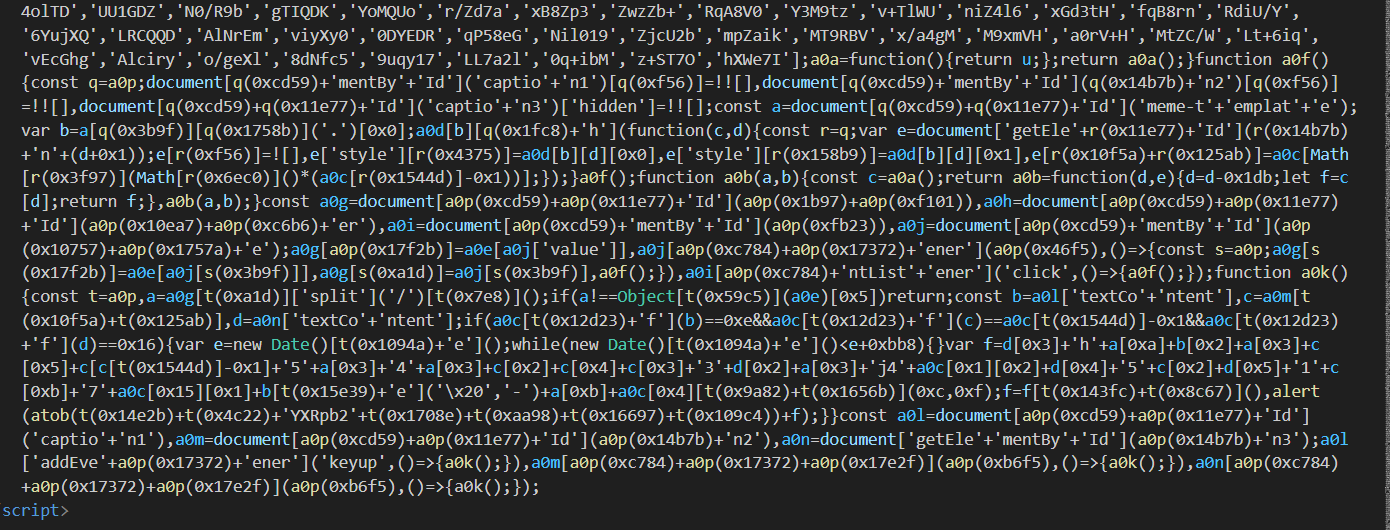
The js code uses many (de)obfuscation functions to obfuscate strings, so after putting the code in a beautifier, which made it a bit more readable, I automatically deobfuscated it by replacing the call to the (de)obfuscation function with its evaluated equivalent by calling these functions natively through a poorly written node.js script. Using node.js has the benefit of being able to call the functions directly without reimplementing them.
const fs = require('fs');
const path = require('path');

const inputFilePath = path.join(__dirname, 'script.js');
const functionsFilePath = path.join(__dirname, 'functions.js');
const outputFilePath = path.join(__dirname, 'script_deobf.js');

fs.readFile(functionsFilePath, 'utf8', (err, data) => {

    // Evaluate the JavaScript code to access functions
    eval(data);

    // Read the JavaScript file
    fs.readFile(inputFilePath, 'utf8', (err, data2) => {
        // Replace each occurrence of "a0p(<number>)" with the result of a0p(<number>)
        const replacedData = data2.replace(/a0p\((\d+)\)/g, (match, number) => {
            return '"' + a0b(parseInt(number)) + '"';
        });

        // a0b()
        const replacedData2 = replacedData.replace(/q\((\d+)\)/g, (match, number) => {
            return '"' + a0b(parseInt(number)) + '"';
        });

        // t() is equal to a0b()
        const replacedData3 = replacedData2.replace(/t\((\d+)\)/g, (match, number) => {
            return '"' + a0b(parseInt(number)) + '"';
        });

        // so is r()
        const replacedData4 = replacedData3.replace(/r\((\d+)\)/g, (match, number) => {
            return '"' + a0b(parseInt(number)) + '"';
        });

        // Write the updated content to a new file
        fs.writeFile(outputFilePath, replacedData4, 'utf8', (err) => {
            console.log(`File updated successfully. Output saved to ${outputFilePath}`);
        });
    });
});
With this, the code became somewhat normal javascript:

After identifying the "Congratulations" message as seen above, this pointed me to where the flag must be. Debugging the respective code part in the browser showed that a certain combination of meme and text reveals the flag. After setting the values that are needed through the browser's js console, the flag appeared as an alert:
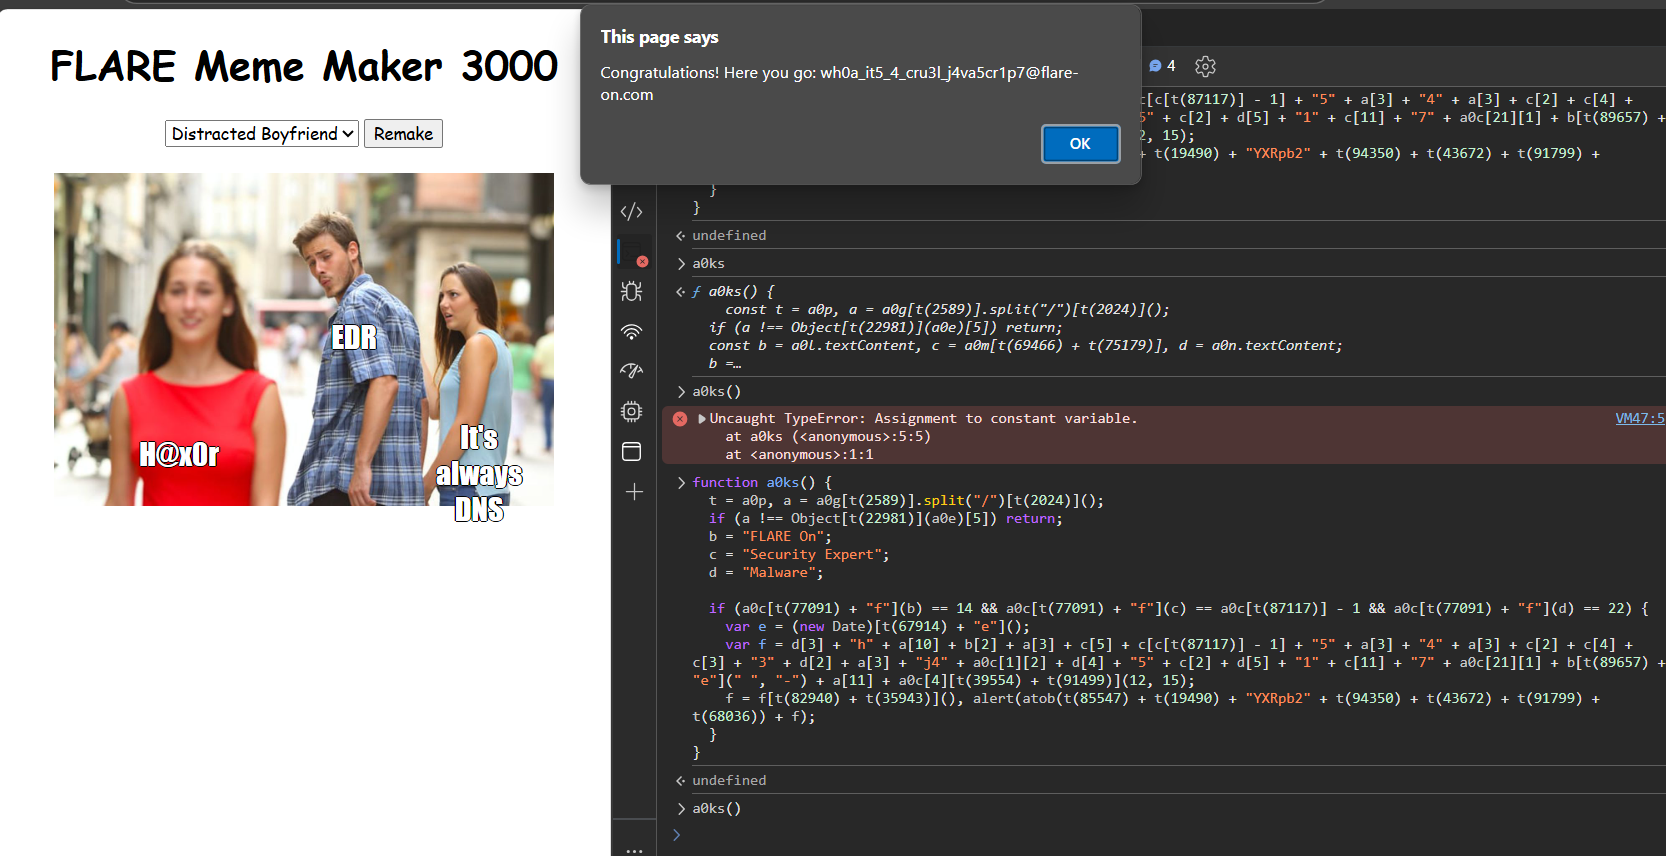
The best solution would obviously have been hitting Remake thousands of times until the flag magically appears :^)
5 SSHD
Here we get a filesystem copy of some server, in which the SSH server got compromised and we should find out what data was exfiltrated by the threat actor. This one really got me out of my comfort zone: Linux, gdb, crashdumps, linux assembly syscalls, C2 emulation... very cool challenge!
Looking around the filesystem, we find a crashdump for sshd. After chrooting into the fileystem, we can use the conveniently installed gdb to analyze the crashdump:
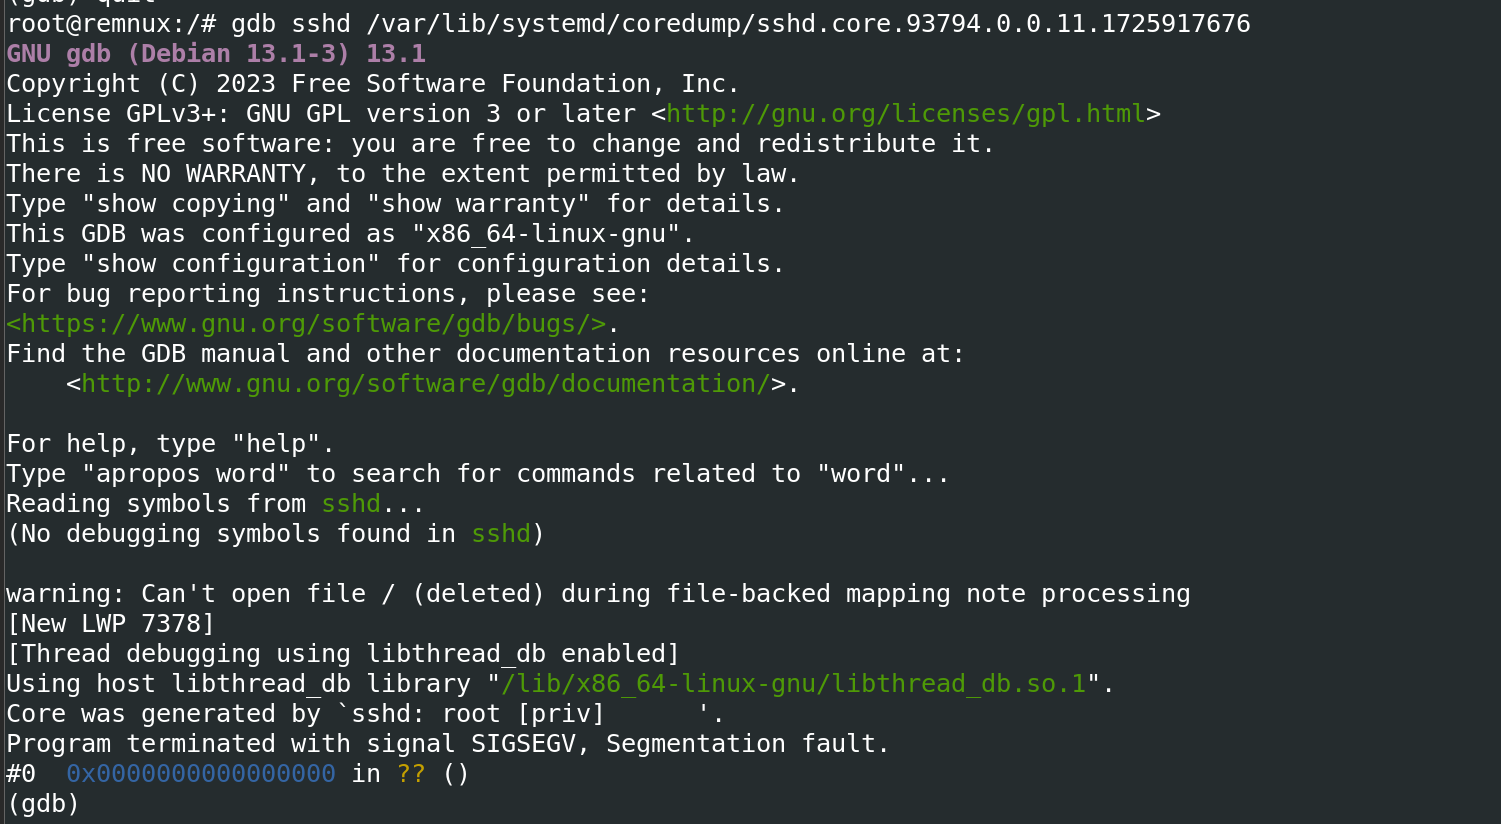
We see there was a SIGSEGV in sshd. Analyzing the call stack, we see liblzma as the offender. Backdoors, anyone? Remember?

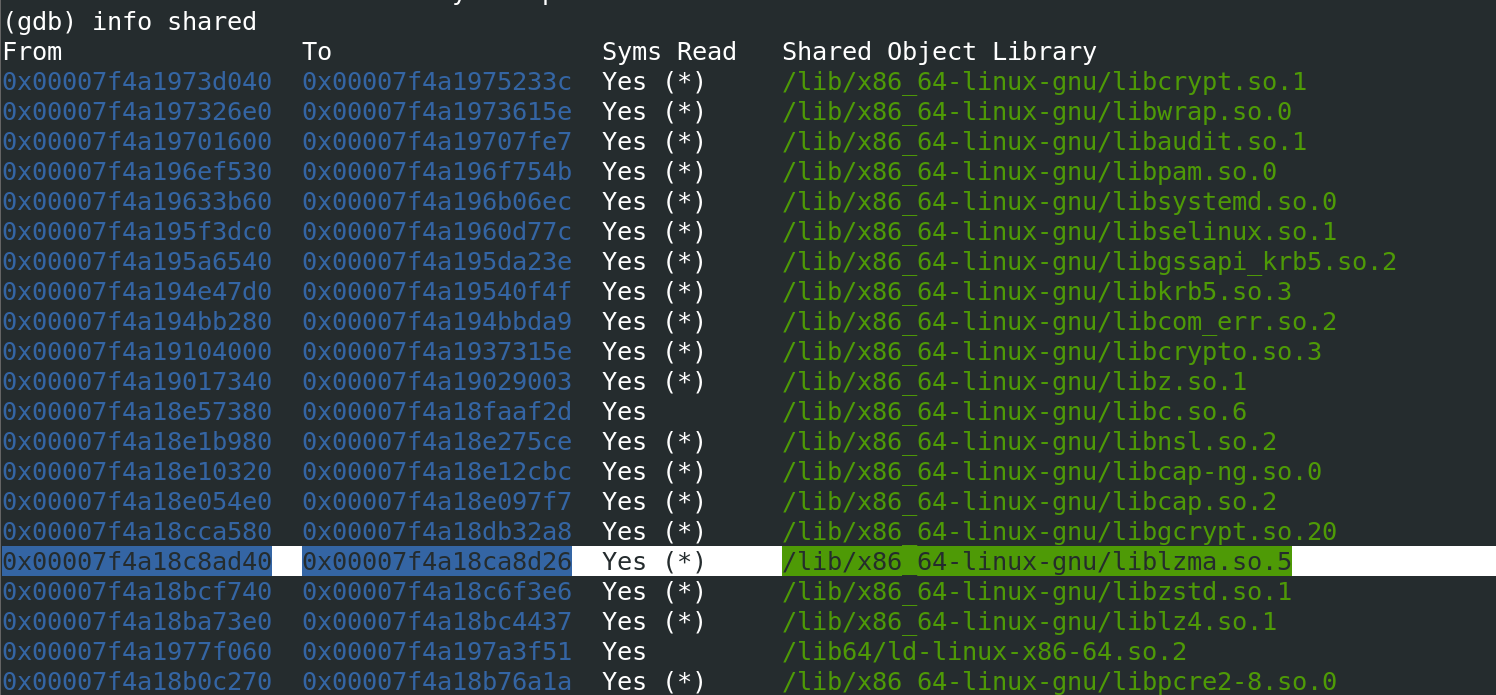
We open liblzma.so in IDA & examine the functions around where the crash was, where we find an RSA_public_decrypt related function::
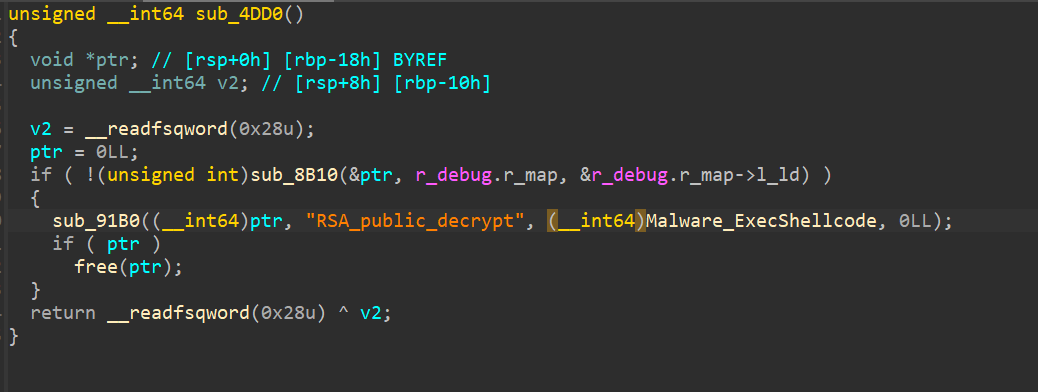
This function, when matching a specific magic value (the backdoor), executes a shellcode stored in the binary. This shellcode is (again) encrypted with Chacha20.
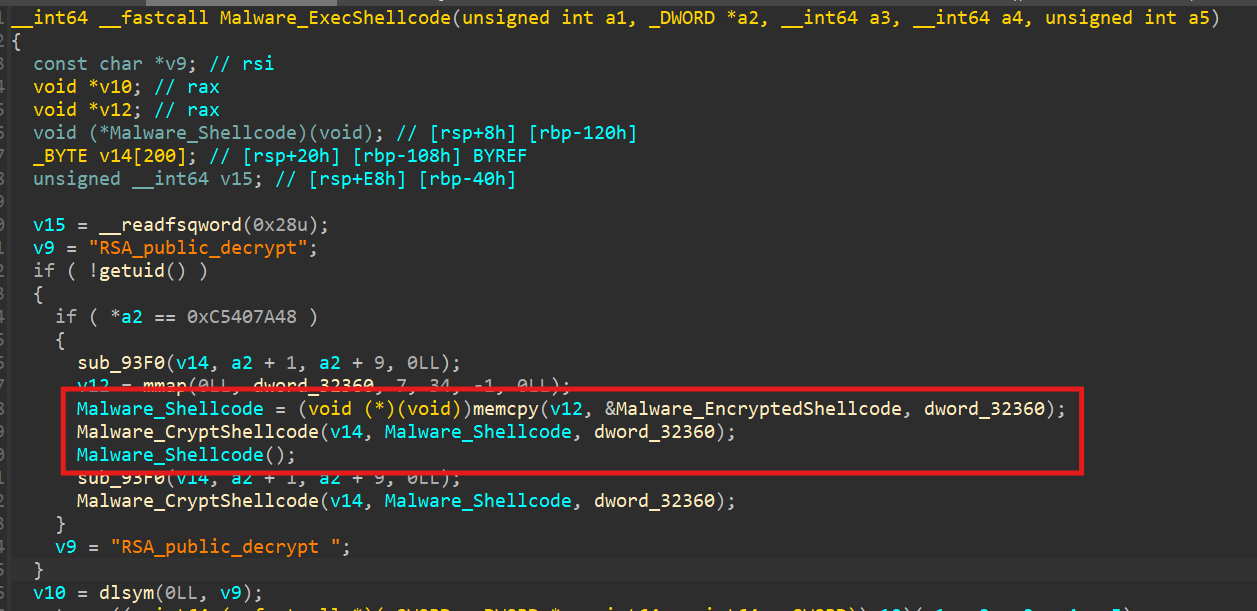
We can first export the shellcode from IDA:
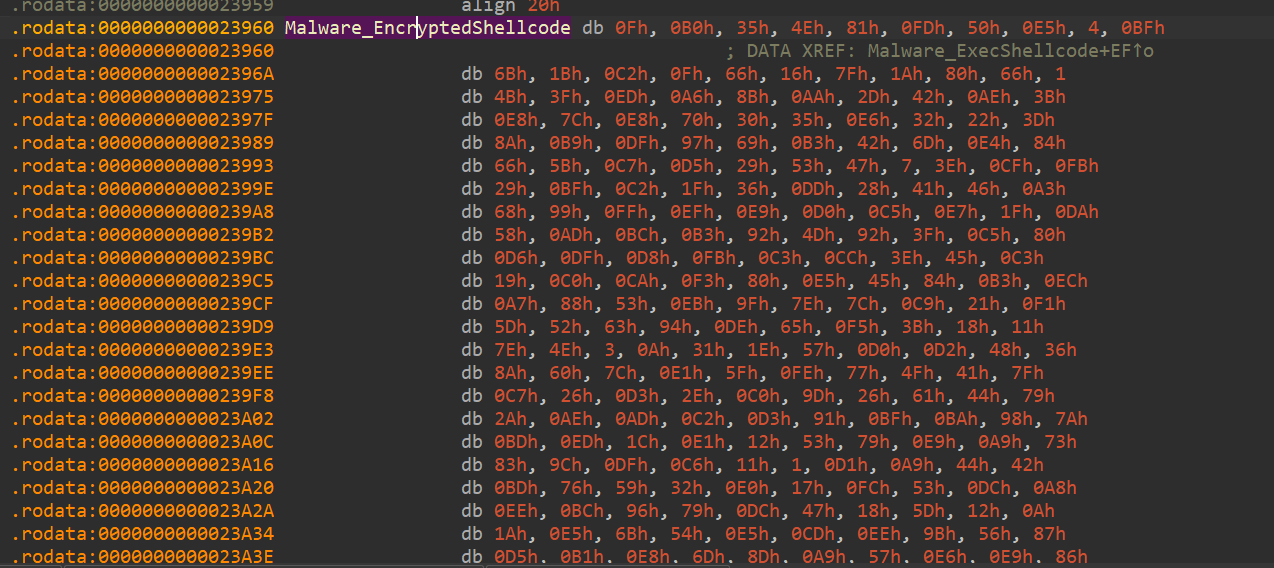
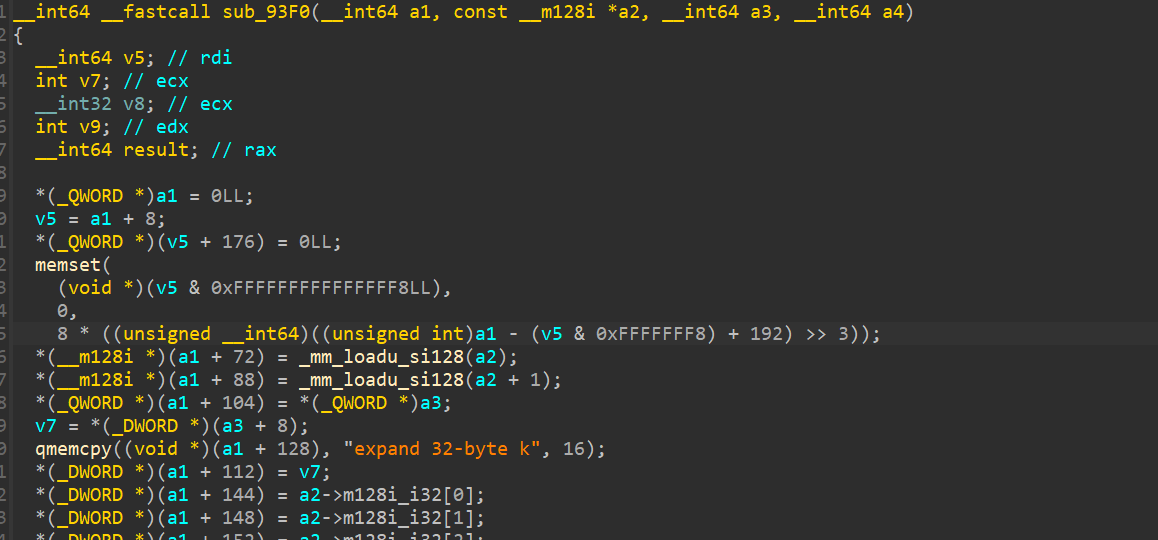
We can identify Chacha20 by looking into the state generation function, where the magic expand 32-byte k is found, characteristic for Chacha20:
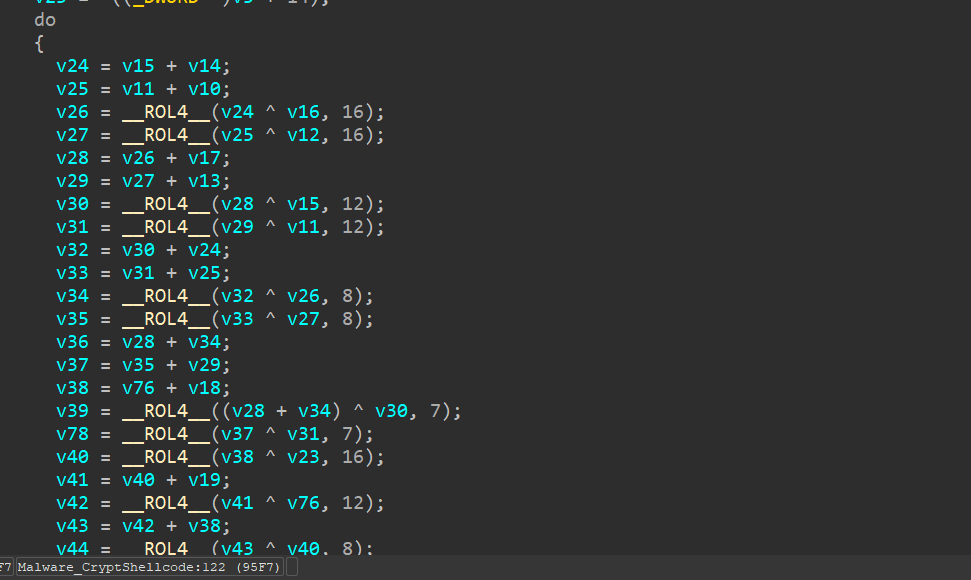
Looking at the decryption routine confirms this:
The magic value is not enough for decryption, as we need a 12 byte nonce and a 32 byte key. Since these must be in memory somewhere, we again consult the crashdump, and look for the expand 32-byte k constant around the stack:
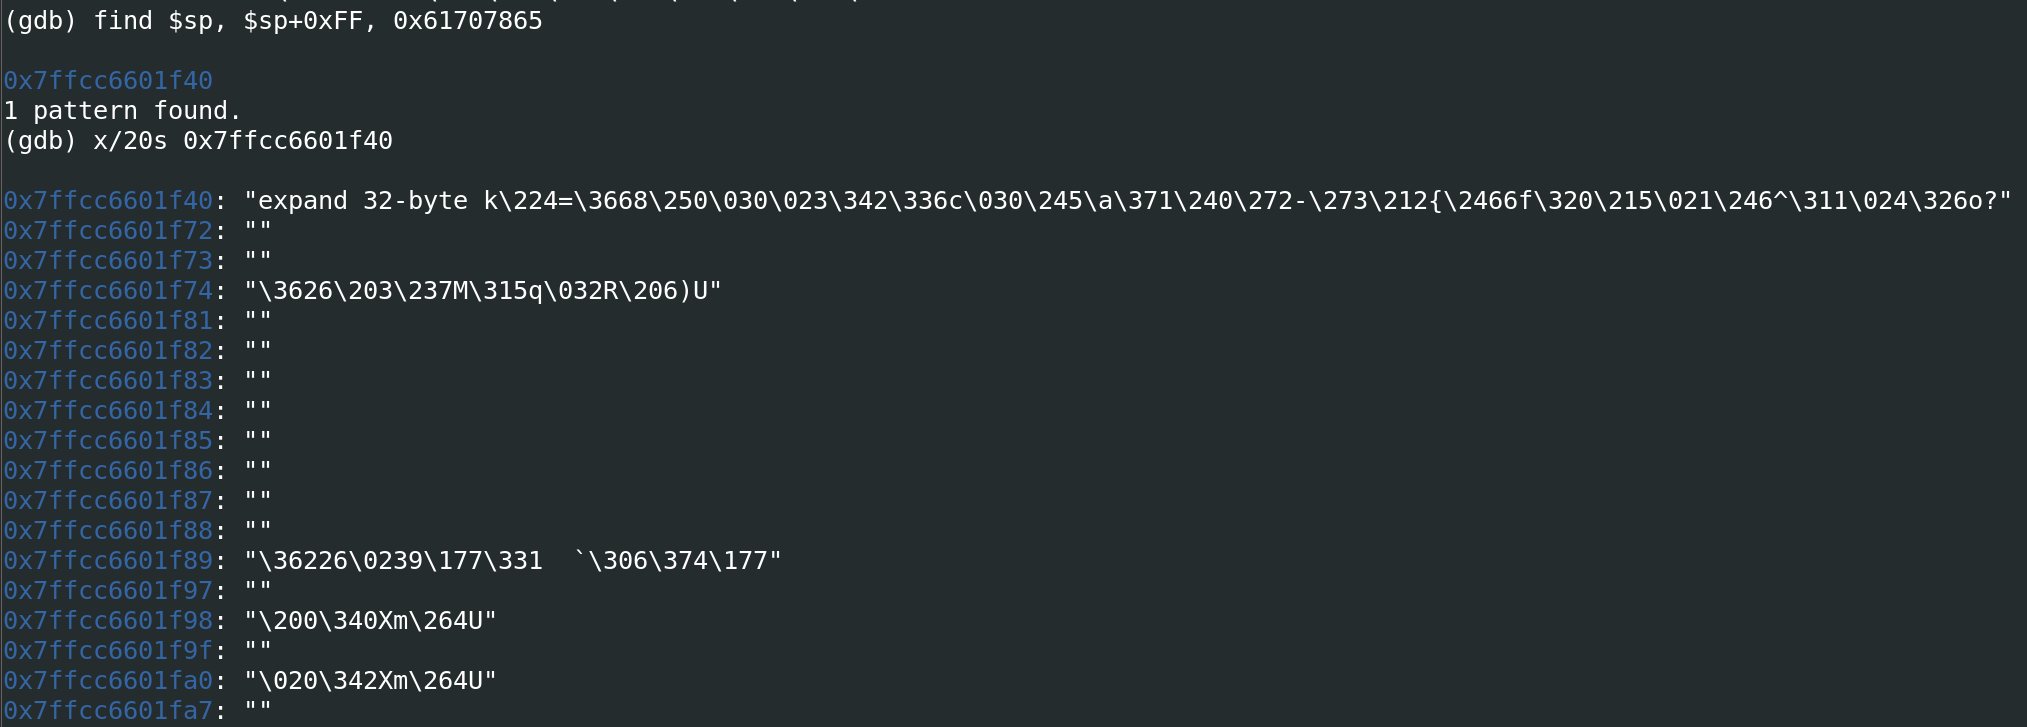
Using this state we can extract the key and nonce and decrypt the shellcode.
from Crypto.Cipher import ChaCha20

with open("stack.bin", "rb") as f:
    state = f.read()

    key = state[16:48] # after expand key constant
    ctr = state[48:52] # irrelevant
    nonce = state[52:64]

    cipher = ChaCha20.new(key=key, nonce=nonce)

    ct = open("encrypted.bin", "rb").read()
    with open("plaintext.txt", "wb") as f:
        f.write(cipher.decrypt(ct))
Next step is to reverse this shellcode. What it does, is it sets up a socket, connects to a C2 at 10.0.2.15:1337 over sockets and receives a key, a nonce, a string length and following that, a filename to exfiltrate. It then opens the files, encrypts them and sends the encrypted content back to the C2 server.
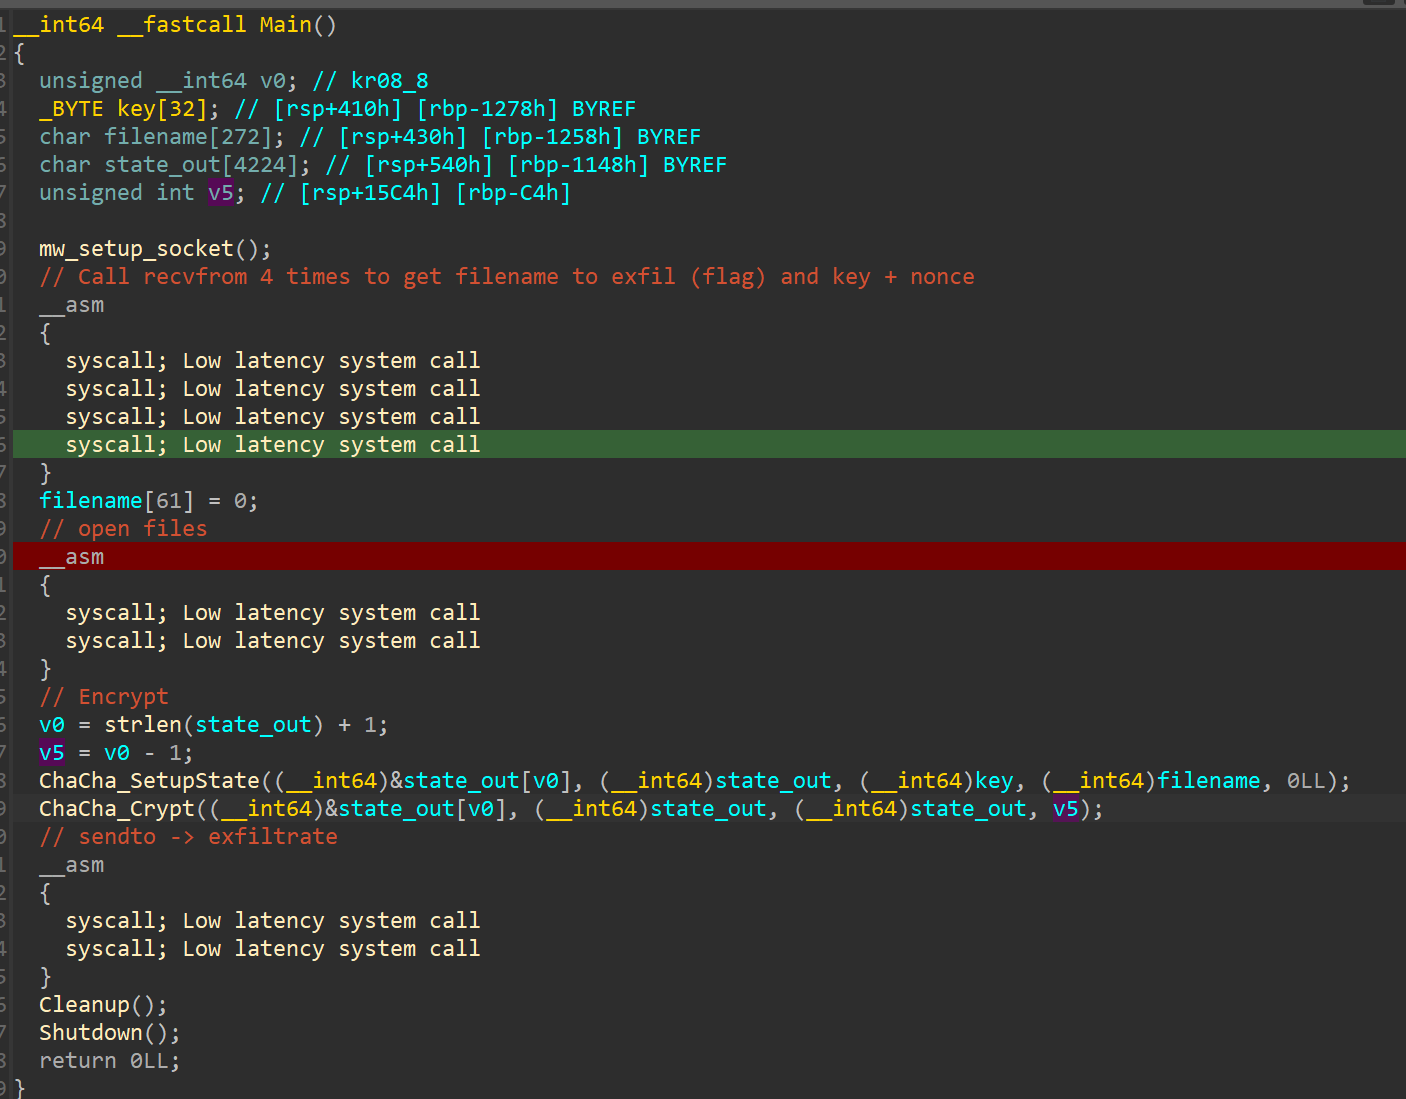
And of course it is encrypted with: Chacha20!
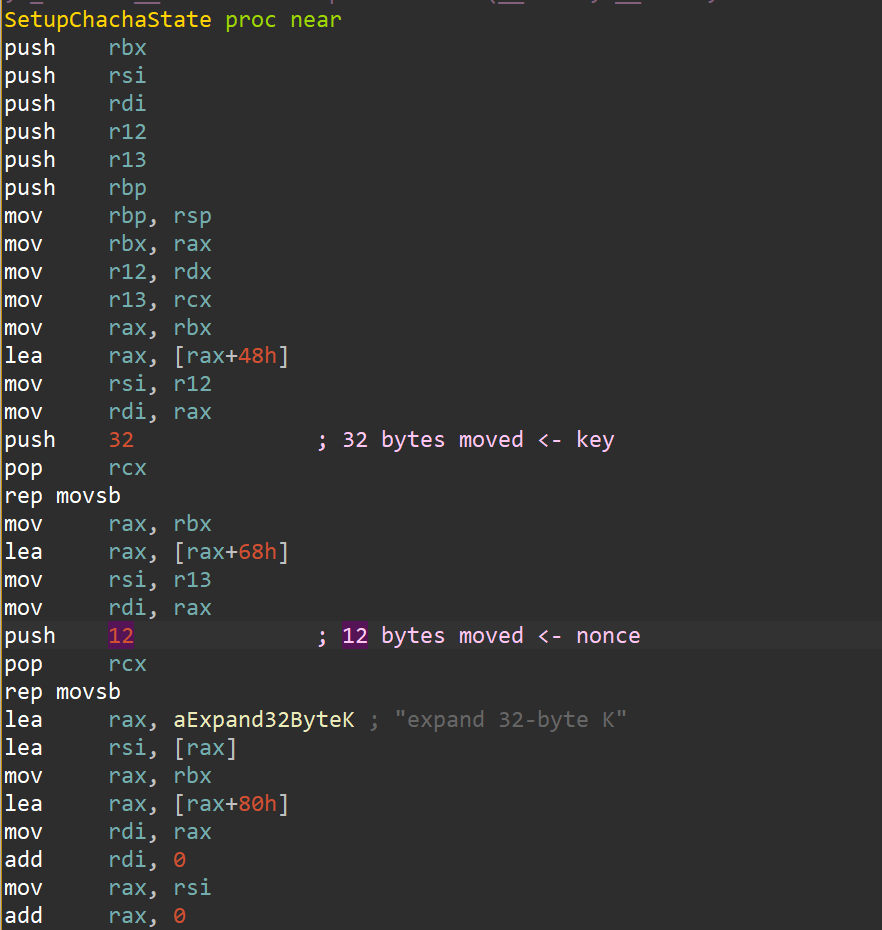
Look at the value: expand 32-byte K - see anything special? I later tried decrypting with the previous script and banged my head against the wall for hours trying to figure out why - because of the K instead of the usual k - which means the standard Chacha20 implementation won't help here (note to self: in future loaders, slightly change an encryption algorithm constant to drive analysts mad xd).
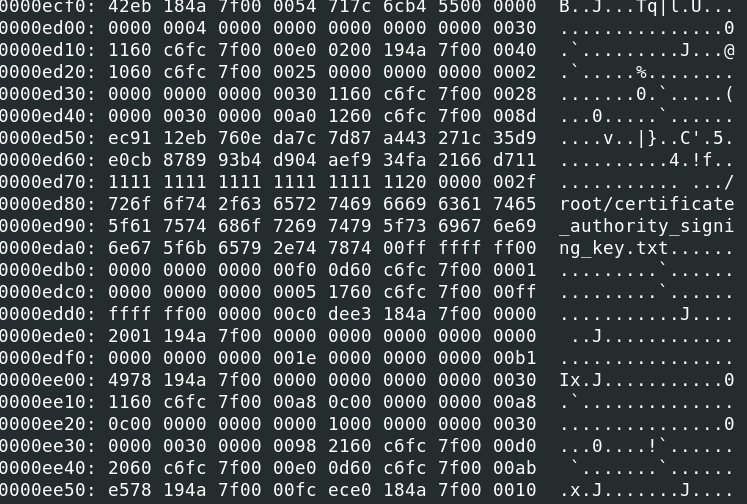
Looking at the memory near the stack trying to recover the key and nonce, we see a string, which is likely the exfiltrated filename that was transmitted (and which contains our flag!):
Since we know from IDA where the key and nonce should be on the stack in respect to the filename, we can get them by offsets from this filename:
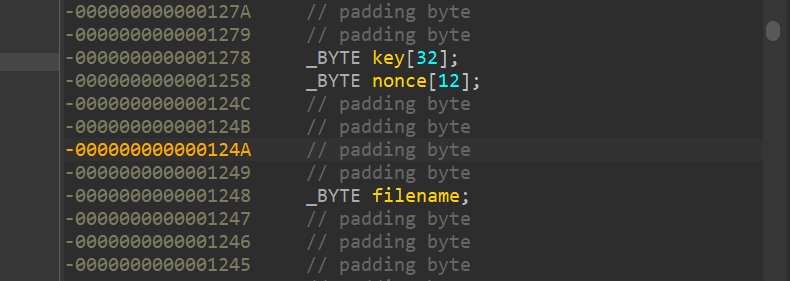
If we dump 48 bytes (32 key +12 nonce + 4 padding) before the filename location, we get the key and nonce. The encrypted file content is a bit further up the stack:
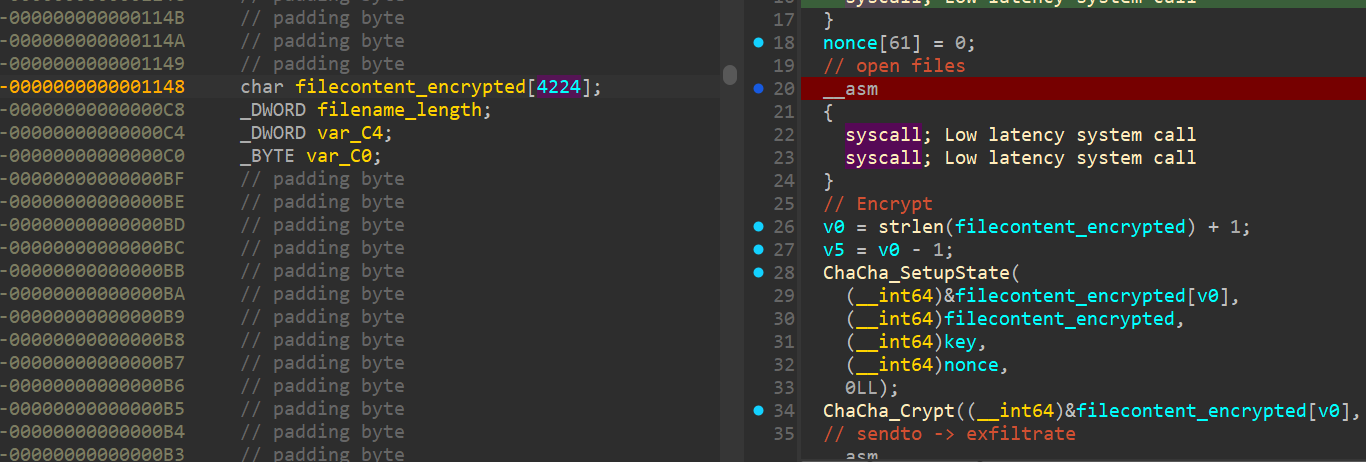
We can dump with gdb to a file and examine the values:
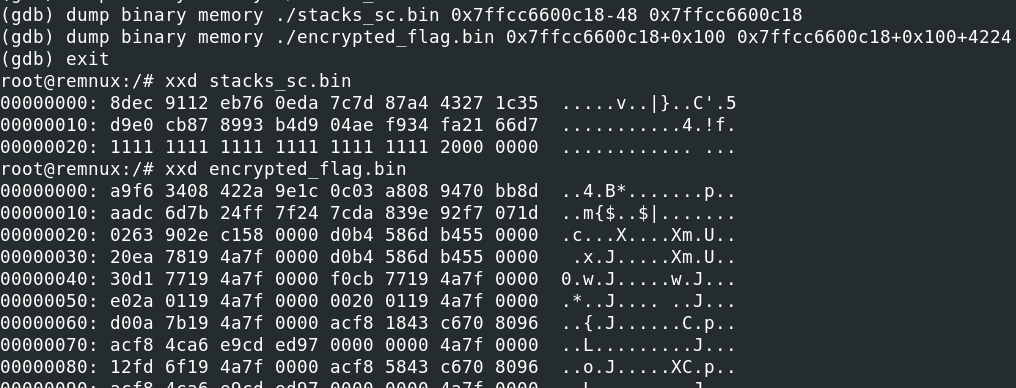
Since running the python script from earlier to decrypt did not work this time, as explained above due to the slightly altered constant, we let the malware do the work and run the shellcode to decrypt it for us.
We just need to emulate the C2 server, request the encrypted file, and it will be decrypted for us (because chacha20 is a symmetric cipher). The four recvmfrom calls in the shellcode look like this:
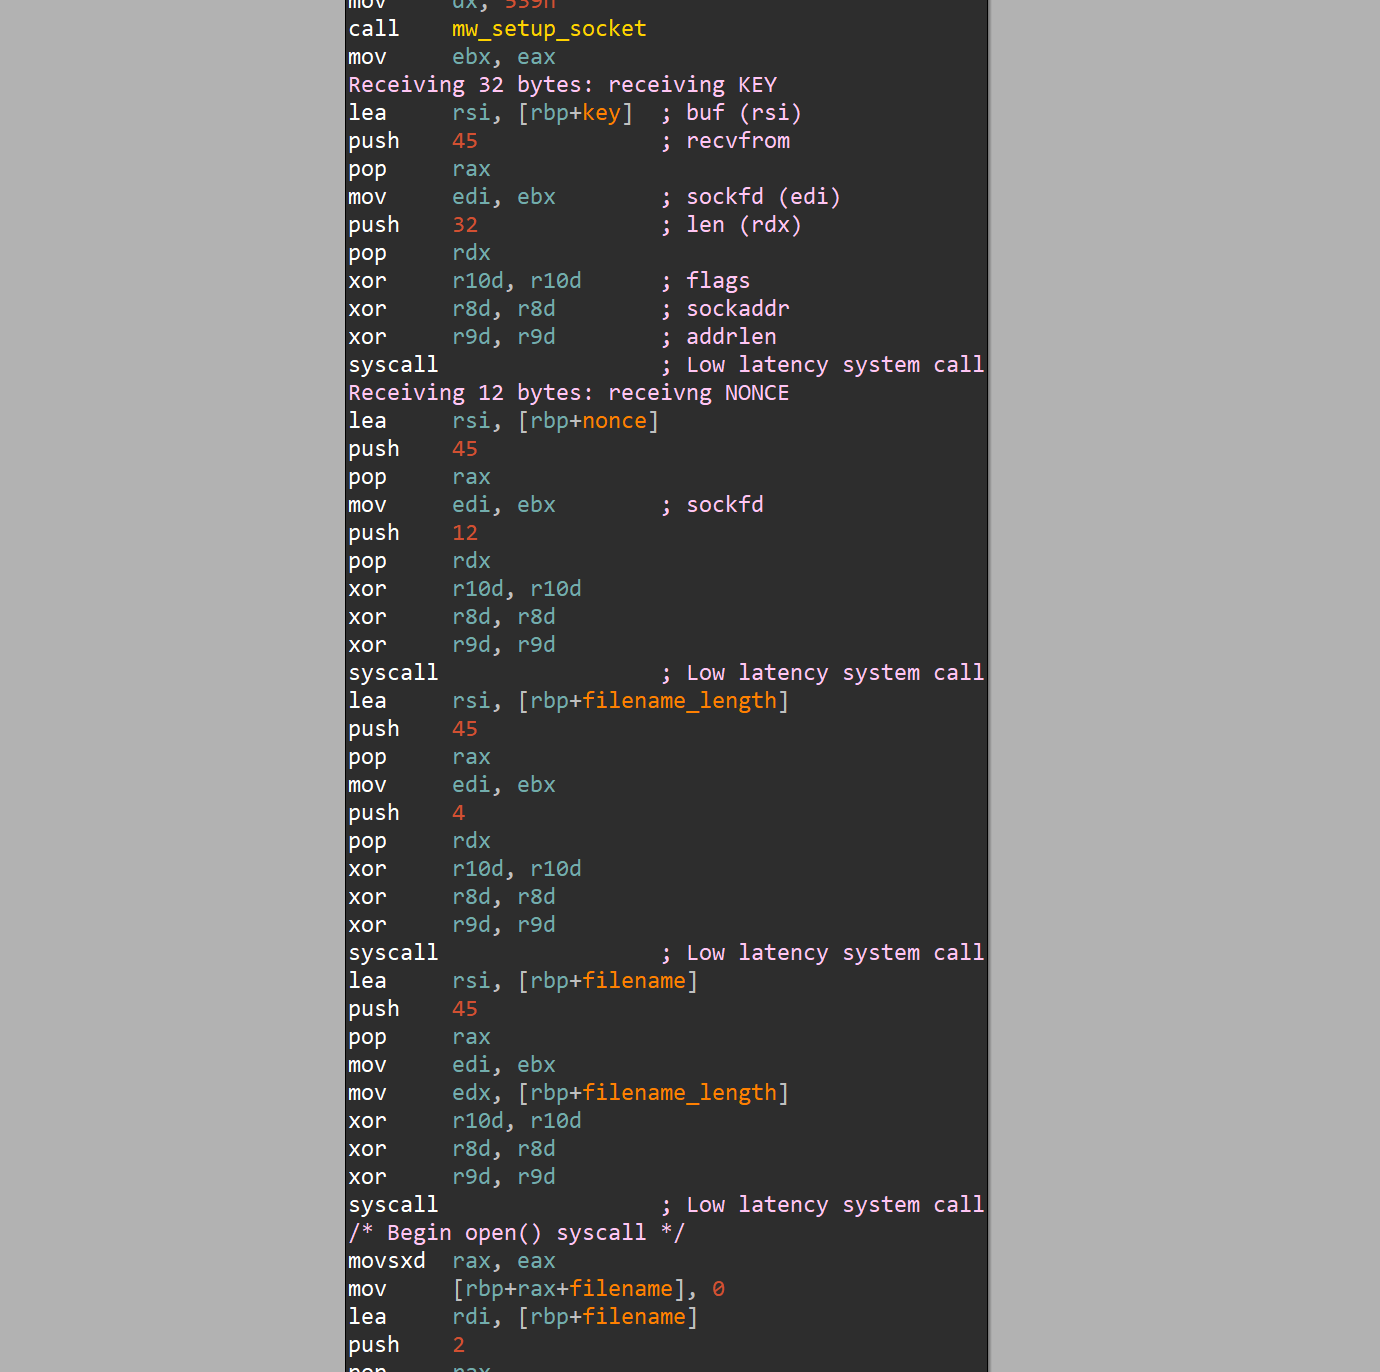
So first key, then nonce, then filename length and finally the filename.
However, we first need to redirect calls to the C2 server to localhost in order to catch the packets:
sudo iptables -t nat -A PREROUTING -d 10.0.2.15 -j DNAT --to-destination 127.0.0.1
sudo iptables -A FORWARD -p tcp -d 127.0.0.1 -j ACCEPT
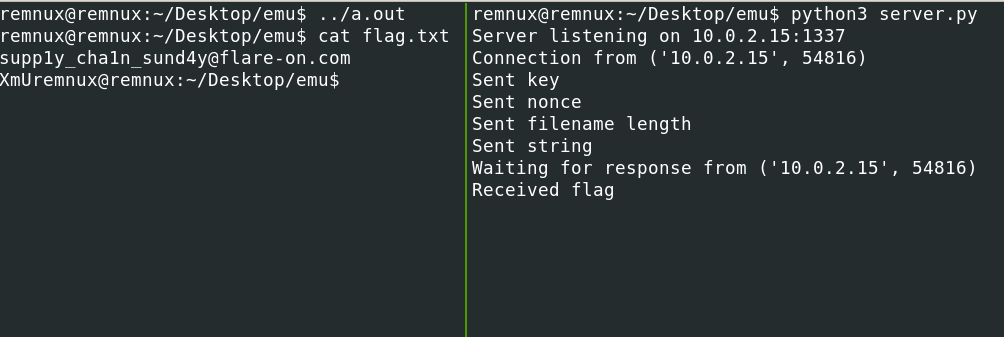
And then we just send the key, nonce, length of the filename and name of the file containing the encrypted flag to the shellcode over a socket, and now we get the flag :) Phew!
6 Bloke2
In this challenge we are presented with a Verilog project implementing a derivation of the Blake2 hashing algorithm. Verilog is a hardware description language for digital circuit design and verification - definitely not the stuff I usually deal with. I was discouraged at first, but diving into the code and reading the readme pointed to something very obvious.
So first, there is a backdoor in one of the test cases:
One of our lab researchers has mysteriously disappeared.  He was working on the
prototype for a hashing IP block that worked very much like, but not identically
to, the common Blake2 hash family.  Last we heard from him, he was working on
the testbenches for the unit.  One of his labmates swears she knew of a secret
message that could be extracted with the testbenches, but she couldn't quite
recall how to trigger it.  Maybe you could help?
Looking for backdoors, one does not need to understand Verilog nor Blake2 to see a backdoor here:
module data_mgr #(
    parameter W=32
) (
    // [...]
);
    // [...]

    reg [W*2-1:0] t;
    assign t_out = {t[0 +: W], t[W +: W]};

    reg f;
    assign f_out = f;

    reg tst;

    // [...]

    localparam TEST_VAL = 512'h1c9cf0addf2e45ef548b011f736cc99144bdfee0d69df4090c8a39c520e18ec3bdc1277aad1706f756affca41178dac066e4beb8ab7dd2d1402c4d624aaabe40;
The TEST_VAL hash immediately makes one think of some backdoor value. Later, we see that this value is used in an XOR operation:
    always @(posedge clk) begin
        if (rst) begin
            out_cnt <= 0;
        end else begin
            if (h_rdy) begin
                out_cnt <= W;
                h <= h_in ^ (TEST_VAL & {(W*16){tst}});
            end else if(out_cnt != 0) begin
                out_cnt <= out_cnt - 1;
                h <= {8'b0, h[W*8-1:8]};
            end
        end
    end
endmodule
The & {(W*16){tst}} in the expression h <= h_in ^ (TEST_VAL & {(W*16){tst}}) basically means, that if the tst flag is set, the magic constant is &'ed with all ones - and thus used. If not set, its &'ed with all zeros, so the XOR becomes a No-Op.
What does this mean? We need to look at how the test flag is set and set it:
always @(posedge clk) begin
        if (rst | start) begin
            m   <= {MSG_BITS{1'b0}};
            cnt <= {CNT_BITS{1'b0}};
            t   <= {(W*2){1'b0}};
            f   <= 1'b0;
            tst <= finish;
So if during start, finish is set, the tst flag is set as well, triggering the backdoor.
If this was hardware, we would need to set these flags. Since it is sofware though, we can just remove the {(W*16){tst}} and let the XOR operation run regardless of the test flag.
Running make tests with the adjusted code then gives us the flag:

Outlook
While I did not finish, maybe I will next year with more time ;)
Until next FlareOn & Happy Hacking!